Why Danish Butter Cookies Are the Ultimate Timeless Treat
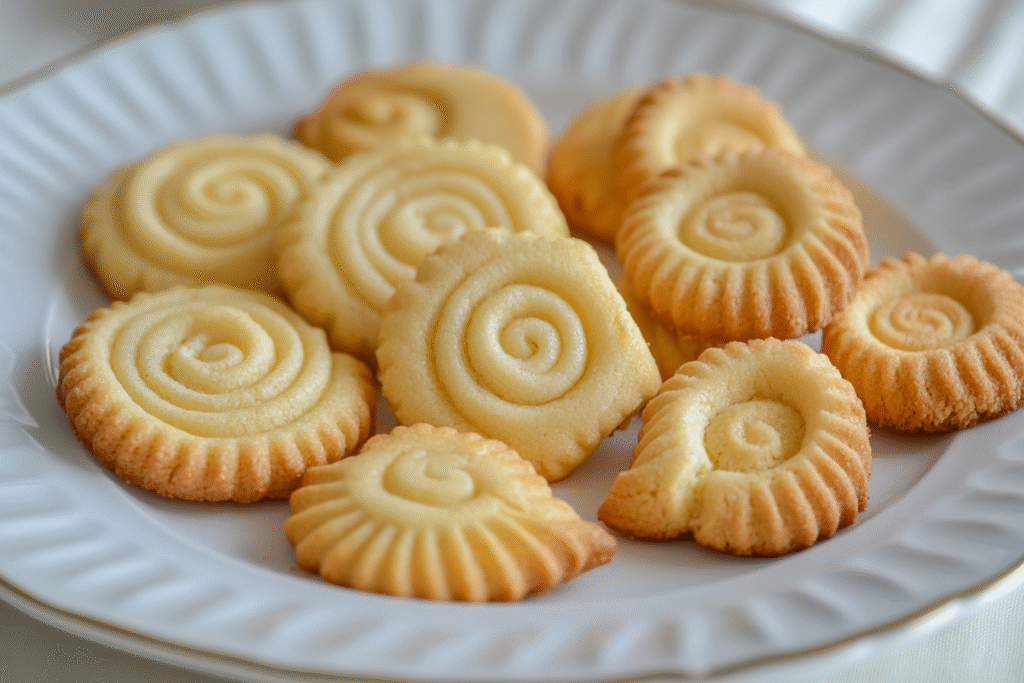
There’s a quiet, nostalgic joy in opening a blue tin of Danish butter cookies — each shape nestled in its white paper cup, promising a crumbly, buttery bite. But making them from scratch? That’s where the magic really happens. Homemade Danish butter cookies are worlds above store-bought, with rich, real butter flavor and a delicate crispness that melts in your mouth.
These cookies are a masterclass in simplicity and technique. With just five core ingredients — butter, sugar, flour, vanilla, and a touch of salt — they prove that less truly can be more. Whether you pipe them into elegant swirls, shape them into rounds, or press them into traditional forms, their signature golden hue and crisp texture make them irresistibly snackable and impressively giftable.
Perfect for holidays, afternoon tea, or a rainy baking day, these cookies strike the ideal balance between elegance and comfort. This guide walks you through every step, from choosing the right butter to achieving those classic, crisp-edged swirls.
Choosing the Right Butter (Yes, It Makes a Difference)
It’s not called a butter cookie for nothing — the quality and flavor of the butter will define the entire taste of your cookie. Here’s what to look for:
- European-style butter: With 82–85% butterfat, this richer, creamier butter yields a deeper flavor and crisper texture.
- Salted vs. unsalted: Always use unsalted butter for precision. You’ll add your own salt separately for better flavor control.
- Room temperature: Butter should be soft enough to beat easily but not greasy or melty. This ensures the dough pipes smoothly and holds its shape.
A good Danish butter cookie should taste like, well, butter — not margarine or oil or flavoring. Don’t skimp here!
The Classic Shapes and How to Make Them
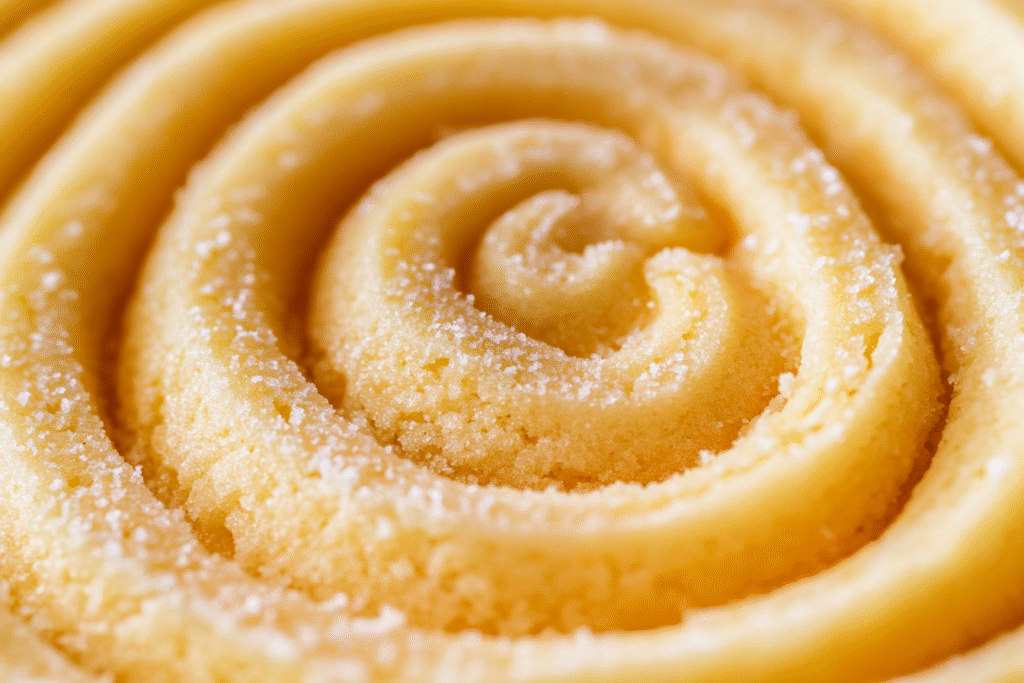
One of the charms of Danish butter cookies is their variety of shapes — traditionally including rings, swirls, pretzel shapes, and piped rounds. These shapes aren’t just for aesthetics; the form influences texture, browning, and even crispness.
How to shape them:
- Swirls and rings: Use a piping bag fitted with a large open or closed star tip. The dough should be soft but hold its form.
- Pressed cookies: Use a cookie press or shape with a fork for a traditional look.
- Sliced rounds: For a no-pipe method, chill the dough into a log and slice into thin, even rounds before baking.
Swirl shapes tend to be the most recognizable and are surprisingly easy to master with a few tips (see below).
Piping Tips for Perfect Swirls
Piping can be intimidating, but it’s totally doable with the right prep:
- Use a large open or closed star tip (Ateco 826 or Wilton 1M are great).
- Use a sturdy piping bag, ideally cloth or heavy-duty disposable. Thin plastic ones may burst under pressure.
- If the dough is too firm, let it sit for a few minutes or warm it slightly by kneading the bag gently in your hands.
- Pipe onto unlined, ungreased baking sheets or parchment. Silicone mats can cause spreading.
Practice a few swirls before committing. You’ll quickly find your rhythm.
Ingredient Precision and Substitution Tips
These cookies are less forgiving than they appear — measuring accurately makes all the difference. Use a kitchen scale for the most reliable results.
Can you add flavors?
Yes! Add subtle variations like:
- Lemon or orange zest
- Almond extract (a tiny splash)
- Ground cardamom or cinnamon
- Dip half in melted chocolate and sprinkle with sea salt or chopped nuts
But keep it minimal — you don’t want to overpower the butter.
Substitutions:
- Gluten-free: Use a 1:1 gluten-free all-purpose flour blend. Texture will be slightly softer.
- Dairy-free: Substitute a high-quality plant-based butter with similar fat content. Not ideal, but doable.
- Sugar alternatives: Use only fine granulated sugar — powdered sugar or coarser sugars affect structure.
Getting That Signature Texture
The goal? A light, crisp cookie that almost shatters when bitten but still melts on the tongue. That comes down to:
- Creaming the butter and sugar properly: Incorporate enough air for lightness, but don’t overmix.
- Avoiding overbaking: They should be just golden on the edges, not deeply browned.
- Chilling the piped dough: Helps hold their shape and prevents excess spreading.
Don’t skip the chill — even a quick 15–30 minutes in the fridge before baking makes a big difference.
Tools You’ll Need
While this is a simple recipe, a few tools make the process smoother:
- Electric hand mixer or stand mixer (paddle attachment)
- Piping bag with large star tip (open or closed)
- Baking sheets
- Parchment paper (optional, but preferred for even browning)
- Cooling racks
- Cookie press (optional for alternative shapes)
Optional but helpful: kitchen scale, offset spatula, and cookie scoop for shaping consistency.
Ingredients
- 1 cup (227g) unsalted butter, softened
- 2/3 cup (130g) granulated sugar
- 1 large egg, room temperature
- 1 1/2 tsp pure vanilla extract
- 2 cups (250g) all-purpose flour
- 1/4 tsp fine sea salt
- Optional: 1 tbsp milk (only if dough is too stiff to pipe)
- Optional: extra sugar or sanding sugar for topping
Instructions
1. Cream the Butter and Sugar
- In a large bowl, beat softened butter and sugar together on medium speed until light and fluffy, about 2–3 minutes.
- Scrape down the sides of the bowl to ensure even mixing.
2. Add Egg and Vanilla
- Beat in the egg until fully incorporated.
- Add vanilla extract and mix until smooth.
3. Add Dry Ingredients
- In a separate bowl, whisk together flour and salt.
- Add dry ingredients to the wet mixture in batches, mixing on low speed until a soft dough forms.
- If the dough is too stiff to pipe, add 1 tbsp of milk to loosen it slightly.
4. Pipe the Dough
- Transfer dough to a piping bag fitted with a large star tip.
- Pipe onto parchment-lined baking sheets in swirls, rings, or pretzel shapes, leaving 1 inch between cookies.
- Chill the trays for at least 15–30 minutes.
5. Bake
- Preheat oven to 350°F (175°C).
- Bake cookies for 10–13 minutes, or until edges are just turning golden.
- Cool on baking sheets for 5 minutes, then transfer to wire racks to cool completely.
6. Optional Decoration
- Sprinkle with sanding sugar before baking for sparkle.
- Dip cooled cookies halfway in melted dark or white chocolate.
- Top with crushed nuts or sea salt flakes for a modern twist.
FAQs and Troubleshooting
Why did my cookies spread too much?
Your butter may have been too soft or the dough too warm. Always chill piped dough before baking.
Why is my dough too stiff to pipe?
Butter may have been too cold, or you added too much flour. Add 1 tbsp of milk and mix briefly.
Can I use a cookie press instead of piping?
Yes! This dough works beautifully in a cookie press for classic pressed shapes.
Do I need to refrigerate the dough?
Not before piping, but after piping — yes. Chilling helps the cookies keep their shape.
Storage and Shelf Life
Room temperature: Store in an airtight container for up to 10–12 days.
Freezing baked cookies: Freeze in layers separated by parchment paper for up to 2 months. Thaw at room temp.
Freezing unbaked dough: Pipe onto sheets and freeze solid, then store in freezer bags. Bake from frozen, adding 1–2 extra minutes.
These cookies make excellent gifts — pack in tins with parchment dividers for a beautiful, nostalgic presentation.
Variations and Flavor Ideas
- Chocolate-dipped: Dip in dark or milk chocolate and let set.
- Espresso butter cookies: Add 1 tsp instant espresso to the dough.
- Citrus twist: Add 1 tbsp orange or lemon zest to the dough for brightness.
- Holiday version: Top with colored sanding sugars or crushed peppermint.
Buttery, crisp, and impossible to eat just one, these Danish butter cookies are a baking tradition that never goes out of style. Whether shaped into elegant swirls or simply sliced and baked, they’re the kind of treat that brings people back for more — tin after tin, bite after bite.


